Loading list item at top of listview without losing scroll position

It seemed very easy for me when I started doing it. But later I realised it is no more easy. Adding an item in listview is an ordinary process but keeping the scroll position is a challenge. I did a small research on this but could not find any thing useful. Until I encountered this SO post. It directed me to this amazing link of Chris banes. The following video shows the required final output I achieved.

Problem,

Whenever we add an item and call

adapter.notifyDataSetChanged();

it refresh the listview with new items and hence we lose our current scroll position.

Solution,

While adding new item into a listview, inorder to stop flicking scroll position we need to block laying out children layout of listview. This can be achieved by creating a custom listview.

public class StoryListView extends ListView {

    private boolean blockLayoutChildren;

    public StoryListView(Context context) {
        super(context);
    }

    public StoryListView(Context context, AttributeSet attrs) {
        super(context, attrs);
    }

    public void setBlockLayoutChildren(boolean blockLayoutChildren) {
        this.blockLayoutChildren = blockLayoutChildren;
    }

    @Override
    protected void layoutChildren() {
        if (!blockLayoutChildren) {
            super.layoutChildren();
        }
    }
}

All we need is to set and unset

blockLayoutChildren

boolean while adding an item.

//    get first visible position of the list view
int firstVisPos = listView.getFirstVisiblePosition();

//    get child view at visible 0th position of the listview
View firstVisView = listView.getChildAt(0);

//    set top in pixel of the child view
int top = firstVisView != null ? firstVisView.getTop() : 0;

//    block from laying child layout
listView.setBlockLayoutChildren(true);

//    add new item to the collection
items.add(0, "New Story " + count++);

//    no. of items added in list before firstVisible item - it is '1' in our case
int itemsAddedBeforeFirstVisible = 1;

//    notify the adapter
adapter.notifyDataSetChanged();

//    un block from laying child layout
listView.setBlockLayoutChildren(false);

//    finally set item selection
if (Build.VERSION.SDK_INT >= Build.VERSION_CODES.LOLLIPOP) {
listView.setSelectionFromTop(firstVisPos + itemsAddedBeforeFirstVisible, top);
} else {
listView.setSelection(firstVisPos + itemsAddedBeforeFirstVisible);
}

Code above is self explanatory. The full source code is available in GitHub.

Happy Coding!

How to track App-crash in Android?

I would say it is a million dollar question, since there is no call back to trace app crashes in Android. I had spent much time on figuring out this. But any how, two of my colleagues found a way to trace it (it’s great!!). Here am sharing it as a reference to all.

Step 1 :

Application class is the first to be executed during app launch. Hence we chose to track App-crash in it. The code below, returns the default exception handler that’s executed when uncaught exception terminates a thread.

Thread.UncaughtExceptionHandler defaultSystemHandler = Thread.getDefaultUncaughtExceptionHandler();

Step 2 :

The code below, sets the default uncaught exception handler. This handler is invoked in case any Thread dies due to an un handled exception.

Thread.setDefaultUncaughtExceptionHandler(new Thread.UncaughtExceptionHandler() {
@Override
public void uncaughtException(Thread thread, Throwable ex) {
try {
System.out.println("Ouch! crashed!!!!"); // do your stuff here
if (defaultSystemHandler != null) {
defaultSystemHandler.uncaughtException(thread, ex); // pass the terminating thread and exception to defaultSystemHandler
} else {
android.os.Process.killProcess(android.os.Process.myPid()) // kill app like iOS when crashed
}
} catch (Exception e) {
e.printStackTrace();
defaultSystemHandler.uncaughtException(thread, ex); // pass the terminating thread and exception to defaultSystemHandler
}
}
});

That’s it.!
Happy coding!

2015 in review

The WordPress.com stats helper monkeys prepared a 2015 annual report for this blog.

Here’s an excerpt:

The concert hall at the Sydney Opera House holds 2,700 people. This blog was viewed about 20,000 times in 2015. If it were a concert at Sydney Opera House, it would take about 7 sold-out performances for that many people to see it.

Click here to see the complete report.

Getting Started with Material Design – MaterializeMyApp

I waited long to write about Material design but could not succeed. Now you may find lots of resources regarding material design in web. I done a research and found out a way to start with Material theme in your apps with backward compatibility(pre-Android Lollipop versions – API level > 21).

Step 0 : Android Studio & AppCompat
Google is recommending Android Studio as official IDE for app development. I hated it long ago, but now started loving it(like our girl friend). It is Material theme, recyclerview, cardview friendly IDE. Go & get started with Android Studio for smooth experience.
Using AppCompat theme makes your app to look nice in pre-Lollipop devices too.

Step 1 : AppCompat Material Theme
Customize your app style in res/values/styles.xml for example take any theme of your preference

<style name="myTheme" parent="Theme.AppCompat.Light.NoActionBar"></style>

    <style name="AppTheme" parent="myTheme">
    <!-- for ActionBar / Toolbar -->
        <item name="colorPrimary">@color/primary</item>

    <!-- for status bar style-->
        <item name="colorPrimaryDark">@color/primary_dark</item>

        <item name="colorControlHighlight">@color/accent_translucent</item>


    <!-- for checkBoxes &amp; TextFields etc -->
        <item name="colorAccent">@color/accent</item>
    </style>

    <!-- Floating Action Button style-->
    <style name="FabStyle">
        <item name="android:layout_width">?attr/actionBarSize</item>
        <item name="android:layout_height">?attr/actionBarSize</item>
        <item name="android:layout_margin">@dimen/spacing_large</item>
        <item name="android:background">@drawable/fab_background</item>
        <item name="android:src">@drawable/ic_add_black</item>
    </style>

This style is generalized and suitable for devices with no lollipop(API < 21).
Same style is not applicable for Lollipop device, create a folder as res/values-v21 and style resource file in it. for example

<style name="AppTheme" parent="myTheme">

        <item name="colorPrimary">@color/primary</item>

        <item name="colorPrimaryDark">@color/primary_dark</item>

        <item name="colorControlHighlight">@color/accent_translucent</item>

        <item name="android:colorControlHighlight">@color/accent_translucent</item>

        <item name="colorAccent">@color/accent</item>

        <item name="selectableItemBackground">@drawable/selectable_item_background</item>
        <item name="android:selectableItemBackground">@drawable/selectable_item_background</item>

        <!-- for smooth activity transitions -->
        <item name="android:windowSharedElementEnterTransition">@android:transition/move</item>
        <item name="android:windowSharedElementExitTransition">@android:transition/move</item>
        <item name="android:windowSharedElementsUseOverlay">false</item>
        <item name="android:windowAllowEnterTransitionOverlap">true</item>
        <item name="android:windowAllowReturnTransitionOverlap">true</item>
        <item name="android:windowContentTransitions">true</item>
    </style>

<!-- Floating Action Button Style-->
    <style name="FabStyle">
        <item name="android:layout_width">?attr/actionBarSize</item>
        <item name="android:layout_height">?attr/actionBarSize</item>
        <item name="android:layout_margin">@dimen/spacing_large</item>
        <item name="android:background">@drawable/fab_background</item>
        <item name="android:src">@drawable/ic_add_black</item>
        <item name="android:outlineProvider">background</item>
        <item name="android:stateListAnimator">@anim/fab_elevation</item>
    </style>

Step 2 : User App-Widgets interaction backgrounds
As of Android lollipop user can experience his interaction with app widget like buttons with new ripples. Unfortunately these ripples won’t work with pre-lollipop devices hence their backgrounds can be created under res/drawable/
for example background of clickable widgets res/drawable/selectable_item_background.xml

<?xml version="1.0" encoding="utf-8"?>
<selector xmlns:android="http://schemas.android.com/apk/res/android">
    <item android:drawable="@color/accent_translucent" android:state_pressed="true" />
    <item android:drawable="@android:color/transparent" />
</selector>

For devices with API 21 ripple background of clickable widgets res/drawable-v21/selectable_item_background.xml

<?xml version="1.0" encoding="utf-8"?>

<ripple xmlns:android="http://schemas.android.com/apk/res/android"
    android:color="?attr/colorControlHighlight">
    <item
        android:id="@android:id/mask"
        android:drawable="@color/accent" />
</ripple>

refer this for more.
Step 3 : Use Toolbar not ActionBar in your app
Toolbar is the perfect widget which plays role of a normal actionbar which is compatible with all devices, you need to add this widget in all layout resource file of your activity or fragment. Here is the example to use toolbar.

<?xml version="1.0" encoding="utf-8"?>
<android.support.v7.widget.Toolbar xmlns:android="http://schemas.android.com/apk/res/android"
    android:id="@+id/myToolbar"
    android:layout_width="match_parent"
    android:layout_height="wrap_content"
    android:background="?attr/colorPrimaryDark" />

Step 4 : Use DrawerLayout not Navigation drawer to your app
for example

<android.support.v4.widget.DrawerLayout xmlns:android="http://schemas.android.com/apk/res/android"
    xmlns:tools="http://schemas.android.com/tools"
    android:id="@+id/drawer"
    android:layout_width="match_parent"
    android:layout_height="match_parent"
    tools:context=".MainActivity" >
</android.support.v4.widget.DrawerLayout>

Refer this for an example.
I made a demo app based on some references which involves recyclerview, cardview etc.
Enjoy! Happy Coding!

Custom View – Rating Star – part 4 (5 parts)

Creating a custom view is not that much difficult in Android, I created this custom view in my free time in need of a requirement.
Refer this blog for creating a Star shape custom view.

Source code available at github.

Enjoy! Have fun!

Executing Multiple AsyncTasks at same time

AsyncTask is nothing but executing a long running process such as network call in another thread without disturbing / blocking the running main thread to avoid UI glitches. Since providing a responsive UI is the main objective of main thread. We all aware of creating and executing an asynctask, but may not be aware of running multiple asynctasks at same time for different purposes. Let me discuss this in detail with an example.

Points to be noted from the video.
1. An app with four horizontal progress bars. Let us name them A,B & C,D a separate asynctask is provided to increase the progress of each progress bar.
2. A, B runs serially one after another get finished (normal).
3. C, D runs parallel (both at same time)

AsyncTask class

class asynCTasks extends AsyncTask<ProgressBar, Integer, Void> {

    private ProgressBar pBarIs;

	@Override
	protected Void doInBackground(ProgressBar... params) {
	this.pBarIs = params[0];
	for (int inteGerIs = 0; inteGerIs < 100; inteGerIs++) {
	    publishProgress(inteGerIs);
				
	    try {
		Thread.sleep(200);
	    } catch (InterruptedException e) {
		e.printStackTrace();
            }
	}
	return null;
    }

    @Override
    protected void onProgressUpdate(Integer... values) {
	super.onProgressUpdate(values);
	pBarIs.setProgress(values[0]);
    }
}

onResume() is shown below

@Override
	protected void onResume() {
		super.onResume();

		aTask1 = new asynCTasks();
		aTask1.execute(pBar1);

		aTask2 = new asynCTasks();
		aTask2.execute(pBar2);

		// parallel execution
		aTask3 = new asynCTasks();
		if(Build.VERSION.SDK_INT >= Build.VERSION_CODES.HONEYCOMB)
			aTask3.executeOnExecutor(AsyncTask.THREAD_POOL_EXECUTOR, pBar3);
		else
			aTask3.execute(pBar3);

		aTask4 = new asynCTasks();
		if(Build.VERSION.SDK_INT >= Build.VERSION_CODES.HONEYCOMB)
			aTask4.executeOnExecutor(AsyncTask.THREAD_POOL_EXECUTOR, pBar4);
		else
			aTask4.execute(pBar4);
	}

Note “executeOnExecutor(AsyncTask.THREAD_POOL_EXECUTOR);” it executes more than one asynctasks in parallel.

Get source code from github.

Enjoy! Happy Coding!

“MYSELF AND ANDROID / EMBEDDED SYSTEMS” – 2014 in review.

The WordPress.com stats helper monkeys prepared a 2014 annual report for this blog.

Here's an excerpt:

The concert hall at the Sydney Opera House holds 2,700 people. This blog was viewed about 14,000 times in 2014. If it were a concert at Sydney Opera House, it would take about 5 sold-out performances for that many people to see it.

Click here to see the complete report.

How to use Google Analytics API V4 in Android apps

SamsulHoqueSolution

With Google Analytic s  you can track information including the number of user use your Apps.

So you need to add “gloogle analytic traker id” in your apps. To accomplish these tasks, complete flowing working procedure:

Step-1: Create or signing Google Analytic and collect mobile Tracking ID:

You click this link “Google Analytics” ,show this windows:

9-23-2014 3-07-21 PM

Click “Access Google Analytics, show this windows:

9-23-2014 3-09-46 PM

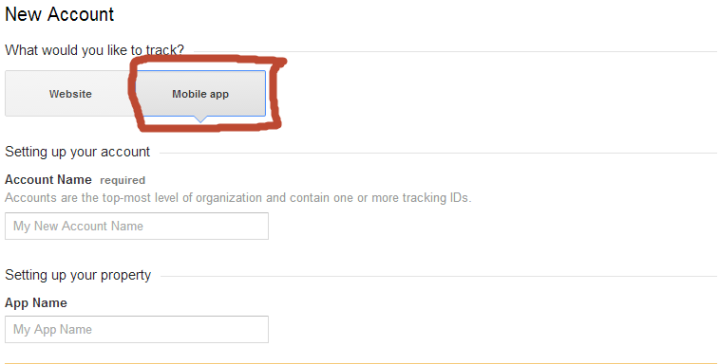
After Sing Up,click on Mobile app

9-23-2014 3-11-12 PM

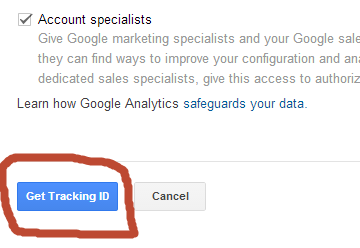
Fill-up necessary information  and click on “Get Trackig ID

9-23-2014 3-14-02 PM

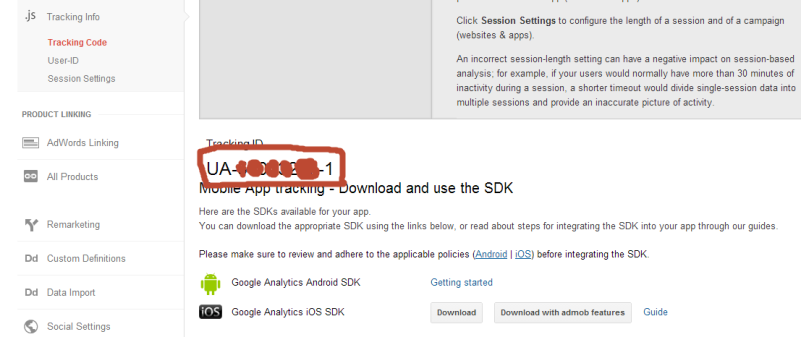
Click on “I Accept” and show this windows:

9-23-2014 3-16-46 PM

step-2:Create a sample project:

Create a project using your IDE …………

step-3: Adding Google Play Services Library to Your Android App:

google-play-services

To develop an app using the Google Play services APIs, you must add Google Play services Library to your app. Google Play services can be downloaded from the SDK Manager. Once it is downloaded…

View original post 981 more words

How to animate line gradually growing from starting point to ending point !

In android there is no proper way to animate line growing from one point to another.

However I achieved it based on the below formula here. Since every one of us is dummy !
To divide an line into equal parts the respective starting point (x1,y1) and ending point (x2,y2) are,

(x,y) = (x1 + k(x2 - x1),y1 + k(y2 - y1))

where “k” = 1 / N (“N” is the total parts).

Step 1: Select (x1,y1) and (x2,y2) of line,

@Override
	protected void onSizeChanged(int w, int h, int oldw, int oldh) {
		super.onSizeChanged(w, h, oldw, oldh);
		
		//	starting point
		x1 = 50;
		y1 = 50;
		
		//	ending point
		x2 = getWidth() / 2 + getWidth() / 4;
		y2 = getHeight() / 2 + getHeight() / 4;
		
		Log.d("line xy xy", x1 + " : "+y1+" : "+x2 + " : "+y2);
		
		divideLineIntoEqualParts();
	}

Step 2: Dividing the line and adding respective points in a List.

	//	dividing line into 50 equal parts
	private void divideLineIntoEqualParts() {
		
		/*
		 * Courtesy : www.dummies.com
		 * (x,y) = (x1 + k(x2 - x1),y1 + k(y2 - y1))
		 * */
		
		listOfPoints.clear();
		for (int k = 1; k <= 50; k++) {
			listOfPoints.add(new PointF(x1 + ((k * (x2 - x1)) / 50),y1 + (k * (y2 - y1)) / 50));			
		}
		
		Log.d("listOfPoints : size : ",listOfPoints.size()+"");
	}

Step 3: onDraw(Canvas canvas)
Each time I try to draw a line from 0th point to another point hence it seems like gradually growing line.

	@Override
	protected void onDraw(Canvas canvas) {
		super.onDraw(canvas);
		
		if(inte < listOfPoints.size()){
			canvas.drawLine(listOfPoints.get(0).x, listOfPoints.get(0).y, listOfPoints.get(inte).x,listOfPoints.get(inte).y, paint);
			inte++;
			
			if(inte < listOfPoints.size()){
				invalidate();
			}
		}		
	}

Source code is available in github.

Enjoy! Happy coding!

To open Background (Minimized) app programatically – using native notification

Many of us might faced this kind of need in their app. It is much more simple to achieve this. I will discuss here what I tried and achieved.
You must be aware of activity life cycle. It states that when ever an activity goes to background(on tapping home button, phone call etc) it executes these series of methods.

onResume(activity is visible and active) -> onPause(before activity becomes invisible) -> onStop(activity invisible).

Yes activity executes onStop() and stays there without executing onDestroy() this is the state we call as app or activity is in background. At any time when we tap the app from stack it goes through below mentioned methods and becomes visible in the same state where we left before.

onRestart() -> onStart() -> again onResume(activity visible).

So I thought of triggering a notification(you can trigger or do whatever techniques you like) just before it goes to background and as a result on tapping the notification it will launch the activity.

Hence onPause() or onStop() methods are suitable to trigger a notification. I choose onStop().

@Override
	protected void onStop() {
		super.onStop();
		
		createNotification();
	}

	private void createNotification() {
		Intent homeIntent = new Intent(this, MainActivity.class);

//              by setting below mentioned action and category we can launch activity from background
		homeIntent.setAction(Intent.ACTION_MAIN);
		homeIntent.addCategory(Intent.CATEGORY_LAUNCHER);

//              or
//		homeIntent.setAction("android.intent.action.MAIN");
//		homeIntent.addCategory("android.intent.category.LAUNCHER");
		
//              Required pending intent
		PendingIntent pendingIntent = PendingIntent.getActivity(this, 0, homeIntent,0);
		
//              to support API 14 I used NotificationCompat
		Notification notiBuilder = new NotificationCompat.Builder(this)   
				.setContentTitle("New mail from " + "test@gmail.com")
		        .setContentText("Subject")
		        .setSmallIcon(R.drawable.ic_launcher)
		        .setContentIntent(pendingIntent)
		        .addAction(R.drawable.ic_launcher, "Call", pendingIntent)
		        .addAction(R.drawable.ic_launcher, "More", pendingIntent)
		        .addAction(R.drawable.ic_launcher, "And more", pendingIntent).build();
		
//              notification will be cleared on tapping
		notiBuilder.flags |= Notification.FLAG_AUTO_CANCEL;	
		
//              triggering notification
		notificationManager.notify(0,notiBuilder);
	}

I used an editText for verification.

For source code github.

Happy coding!